Custom Pages

4/3/15

Friday Faves || Instagram Love || Colorful Canvases

Pin It!


Holy macaroni! I know it's been a while since I last posted but I promise it's for a good reason! I got married a couple weeks ago and had one of the best days of my life so far (more details and tips to come later!). It is crazy how much a single day can consume weeks and months of time for planning. Alas, I am back and in action! Got some new DIY projects coming for the spring season and working on some more community sharing posts. Speaking of which, Friday Faves will now feature the many incredibly talented, inspiring, and downright cool people I've admired, met, and connected with on Instagram. Seriously - that app is a brewing pot of daily awesomeness! 

To kick it off, today's Friday Faves will revolve around the world of "Colorful Canvases," inspired primarily by my gal Courtney (@myfriendcourt), who is an artist and art teacher in Atlanta. As if her feed were not colorful enough, prepare yourself for the beautiful connections she makes with those on Instagram through her #Makeyourmark challenges each month. Every day, people are challenged to doodle, draw, paint, or sketch a particular theme - from waves to circles and from clouds to colors. She's a burst of inspiration and an example of community loving at its finest!! Click to check out her instagram and blog!

@myfriendcourt


The next four artists below also glue my eyes to the screen when I scroll through their feeds! 

TL:@theebouffants | TR: @nataliawrobelart
BL: @katefjury | BR: @artandsoulcreativeco 

1. Kendra Dandy (@theebouffants): This brilliant woman knows patterns like it's nobody's business! Through her print designs of lips, lipstick, shoes, dresses, fruits, and color galore you are immediately transported to a world where you wish everything came patterned...but seriously, wouldn't that be kind of awesome?

2. Natalia Wrobel Art (@nataliawrobelart): I've known this true beauty since my childhood days (we went to the same elementary and high schools!). She creates some of the most mesmerizing array of  colorful paintings I hope to one day be lucky enough to hang in my own home. She also has a studio space which essentially means she's the coolest person in Boston right now, just sayin'.

3. Laura Uy (@artandsoulcreativeco): This talented lady can take the most dangerous animals - bears, foxes, and lions - and turn them into the cutest furry creatures around! From her cards to art prints, you may find yourself wishing you could just snuggle with them and not look weird while doing so. That may be hard to accomplish though...sorry.

4. Katherine Jury (@katefjury): This dazzling painter can literally create the most beautiful messes you've seen, in all the best ways! I love her mixed color palettes, textures, and her serene outlook on life. She also includes many pictures of beaches, sand, and stones - which may just make you wish you were in her shoes (or lack thereof)...all the time.

Please check out these inspirational artists, follow along, and share your thoughts! Come back next friday for my next batch! Oh, you can also find me on Instagram too (@creativekipi)...happy weekend!


8/9/14

DIY || #28 || I've Got Ya Spotted!

Pin It!


So if you know anything about me, you know I'm addicted to polka dots. I'm not quite sure what it is about them, but they combine the perfect combination of spunk, color, and fun to an outfit, especially in the summer. This DIY project definitely indulges not only my love for polka dots, but also my love for pom poms (the 3D version of a polka dot). I first caught onto this style thanks to the fashions of Design Love Fest, with her fabulous polka dot sweater. I found this layered tulle skirt dress on sale at Forever 21 for $12 (here's the same one in black), grabbed a bag of pom poms at Michaels, some fabric glue, and went to town on it! Super easy and super fun way to jazz up any dress or skirt hanging in your closet. Give it a try!


Here's what you'll need: plain dress or skirt (got mine here), colored pom poms, and fabric glue (you could also sew them on by hand if you have the patience for it!).


Steps: simply dot the pom pom with the liquid stitch glue and carefully press it onto the dress fabric. Continue by adding various colors spread out across the skirt. Wait a couple hours for the glue to dry clear. If you're particular about keeping the pom poms secure, feel free to sew them on instead by hand!


Then...don a pair of vibrant, funky shoes (got these blue ones at ModCloth) and have fun!


6/14/13

Friday Faves || #22 || Tooty Fruity

Pin It!
My favorite fruit-inspired fashion wear and accessories!

one | two | three | four | five
tape graphic by Pugly Pixel

3/29/13

Friday Faves || #14 || Triangle Home

Pin It!
top five triangle decor pieces
I have been loving the triangle look on all things decor. I think triangles are such interesting shapes because they can be warm and edgy simultaneously. I dream of the time when I can finally do whatever I wish to my living space, but in the meantime these are my fave triangle decor favorites! And if you're looking for equally killer triangle clothes, these cut out jeans are pretty bomb (see here).

one // two // three // four // five

3/22/13

FRIDAY FAVES || #13 || SPRING CLEANING IN COLOR

Pin It!
spring cleaning tips done colorfully
I was so happy last week when I could roll up my sleeves and get to cleaning. When you're living in a cramped dorm room with midterm books all over your desk, pencils hidden in unsuspecting corners, and Starbucks cups overflowing the recycling bin, there's nothing more refreshing (I think) than wiping away the previous months of stress and hard work. Unfortunately, there is no Staples 'easy button', but I love spring cleaning because of all the color you get to infuse into your space throughout the process. Here are some of the first ways you can tackle your spring cleaning that are sure to brighten and color away winter blues. Good luck!

3/12/13

DIY Project || #15 || Neon Duct Tape Ipad Case

Pin It!

This project is all inspired by NEON! I tend to be quite wary of neon colors. Little zests of it are somehow manageable for me, but I could never rock a neon tee or sneakers despite how much I wish I could. This project, which was previously featured for I Like Fall, otherwise satisfies my zest for neon in a unique way. The iPad case has become one of many Apple products that is perfect for any crafter. We all love making cases, especially after you spent so much money buying the piece of technology itself, why spend more when you can make it yourself! One reason why I love my case is, yes, it is economical, but mostly because I love these duct tape sheets I found while randomly wandering around Michael's. They were only about $1.99 each, so for less than $10 you can make this spunky baby and strut the streets (or the library for me) with a colorful companion in your hands. Hope you guys like it!

neon duct tape ipad case

neon duct tape ipad case

2/22/13

FRIDAY FAVES || #10 || PATTERN ME UP!

Pin It!
one | two | three | four

2/19/13

DIY Project || #12 || Origami Paper Envelopes

Pin It!


I recently made a trip to Blick's Art Materials in Cambridge after visiting friends in Central Square and happened upon these beautiful origami paper bundles. I am by no means an origami expert so I tried to find a 'beginner's 101' DIY project to using them in your everyday life. I decided on making these gift envelopes which can be tailored based on the size of what you wish to place inside (i.e. small gift card vs. birthday card). I simply just love the vibrant patterns of the paper and think anyone else would love it too! Let me know what you think in the comment box below!

INGREDIENTS YOU'LL NEED:

STEP-BY-STEP INSTRUCTIONS:

It's so easy to make a bunch of these and grab 'em when you need a last minute gift package. I tied some with a natural twine string, but you could easily use ribbon, bows, stickers, or whatever you please. Let me know what you think below, and share via the "love it" button!

2/12/13

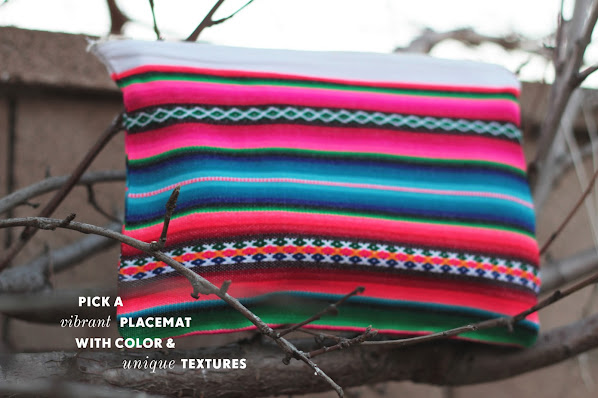
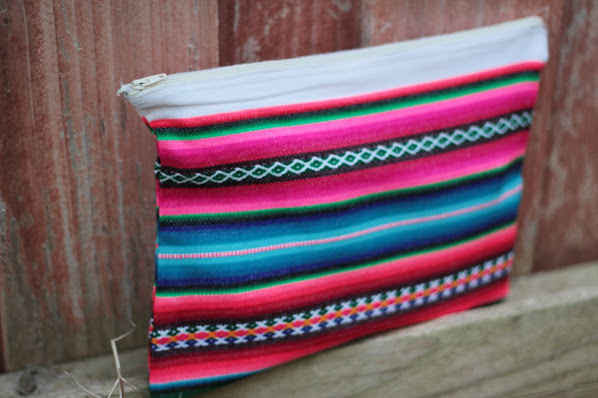
DIY Project || #11 || Turn a Placemat into a Purse

Pin It!
turn a table placemat into a purse
I am so excited to share with you all this quick and easy sewing DIY project. Over the summer of 2010, I had spent eight weeks living and working in La Paz, Bolivia where I bought these gorgeous, colorful placemats in a street market. Thinking I would give them as gifts to friends and family upon return, I fell in love with their vibrant colors and mixed textures -- and of course I wanted to carry this fabulous decor everywhere. Luckily my family only uses a few of them so I took an extra and turned it into a large clutch bag. A fun idea to spice up your dark colored winter wear, let me know what you think!

INGREDIENTS YOU'LL NEED:


INSTRUCTIONS:

STEP ONE: Fold the placemat in half, then begin pinning one end onto the top of the zipper.
turn a table placemat into a large clutch purse
STEP TWO: Taking the other end of the placemat, pin it to the other arm of the zipper. Try opening and closing the zipper to ensure that the placemat does not inhibit the zipper in any way.

DIY turn a table placemat into a large clutch purse


STEP THREE: Sew the edges onto the zipper.
STEP FOUR: Next, turn the bag inside out.

DIY turn a table placemat into a large clutch purse

STEP FIVE: Sew the right side of the bag (where the zipper ends). Repeat to the left side of the bag. If the zipper is longer than the length of the bag, make sure the zipper piece you pull is located inside the area you sew.
STEP SIX: Trim the edges on the sides of the bag for a clean seam inside.

DIY turn a table placemat into a large clutch purse

STEP SEVEN and EIGHT: Turn the bag right-side-out and lightly iron the zipper along the inside of the bag and then along the outer surface for a crisp look.

THE FINAL LOOK:

DIY turn a table placemat into a large clutch purse

2/5/13

DIY PROJECT || #10 || TEA BAG HEART VALENTINES

Pin It!
diy valentine's day tea bags

I love tea. I can (and typically do) drink it every day. Chai, Earl Gray, Peppermint, Black Vanilla...the list goes on and on. Given that tea drinking is such a sophisticated and 'adulty' thing to do, I wanted a Valentine's day idea that would be great for all my other tea-drinking-adulty friends. Below is a tutorial on how to make tea bag heart valentines from a free downloadable template I made that can be printed out on a regular sheet of paper. Each of the valentine hearts has a little message like "Love ya!", "Kiss me?", and "You rock!" so you can sweeten the tea for anyone, and everyone, in your life. Hope you enjoy it! And spread the love via Facebook, Pinterest, Twitter, or any of the other thousand social media outlets!

diy valentine's day tea bags


diy valentine's day tea bags
INGREDIENTS:
free downloadable print out
(click here)
tea bags
scissors
pin
stapler

INSTRUCTIONS:

diy valentine's day tea bags


Step one: Begin by pulling off the original tea bag tag (mine was Twinings).
Step two: Using your scissors, snip off the knot at the end of the string.

diy valentine's day tea bags


Step three: After printing out the free heart & gift bag template, begin cutting out the hearts.
Step four: Take one heart and, using a sewing pin or needle, poke two holes next to each other. Using the pin, gently rip the tiny space between them so that the two holes become a single larger one.

diy valentines day tea bags


Step five: Next, slide the thread of the tea bag into the hole in the heart.
Step six: Tie a knot at the very end and slide the heart tag back down the thread so that it hangs on the end like the original tea bag tag.

OPTIONAL: TEA BAG COVERS

diy valentine's day tea bags


Step seven: Cut out the tea bag cover rectangles from the template, leaving some white spaced borders across all edges. Fold the rectangle in half where the darker and lighter colors meet.
Step eight: Depending on the size of your tea bag (I recommend the smaller ones!), gently tuck the tea bag inside the folded cover and staple the top so that it will stay snugly inside.

valentine's day tea bags

THE FINAL LOOK:


free download valentine's day tea bag hearts

(fits perfectly on regular 8.5" x 11" printer paper)

2/3/13

TRAVEL DELIGHT || #2 || OCEANSIDE FAIRGROUNDS

Pin It!
While back at home over the January winter break, my family and I visited the Oceanside Fair for the first time. It is hosted every Thursday night from 5 to 9pm on an open boulevard just a block or two from the ocean and main pier. I have always been in love with fairs of the variety since I was a kid. Street fairs, carnivals, block parties, craft markets -- love 'em all. Here are a few pictures from our most recent visit. Some interesting things I discovered: people can make wooden roses that smell divine, funnel cake is maybe one of the most delicious and nutrient deficient foods on earth, I have never tried Afghan food which is now on my list of things to do, and California (again) is the best place on earth. 

oceanside fair
oceanside fair

funnel cake

oceanside fair
driving home bokeh

2/1/13

PINSPIRATION || #2 || DOTTED

Pin It!


source 1 | source 2 | source 3 | source 4 | source 5
GET KIPI EVERY WEEK IN YOUR EMAIL!