Custom Pages
6/15/13
Update || Graduation!

Labels:
college,
graduation,
life,
photography,
updates
I did it! I've tossed my hat (literally...and metaphorically) and I'm ready to head into the 'real world'! Sorry for the super silence around the blog for the past month. I've spent the few weeks either stressed out of my mind, sweating on horribly timed hot Boston days, or trying to regain some energy after burning through the end of the year. On graduation day itself, I was so exhausted from the heat and running around that I could barely savor the moment. Thankfully someone from my family kept tossing my camera around and we were able to get plenty of different shots of the whole fiasco. I chose just three for now (trust me, you don't want to see the whole album..theres maybe 500 at least!). The first image, with the cameras and the 2013 banner in the background, I think represents a lot about our time, what it means to 'live an event', and the use of photography as a means not only to document realities but also as a means of capturing pride. Thanks to my dad for snapping that one - along with the thousands of other parents who were bunched around!
This second image I think captures a lot about Harvard and what these past four years have meant to me as an institution and a place of learning. The high beams, the richly vibrant banner flags, the old traditional vows to "Veritas" or "truth", and the honest reality that the resources I've had access to have 'suspended' me to much higher places I could have ever imagined.
And this last photograph needs little explanation. When it comes down to it, graduation was important because it was more than just an individual celebration. Time and time again I found myself fully embraced in the arms of my man, my friends, my family -- all of us saying, "We did it!" I can't even begin to imagine what my life would have been without the people I hold so close to me; to photography - I'm so grateful you can capture that pride.
6/14/13
5/22/13
DIY Project || #22 || Eco-Friendly Plastiband Charger Decorations

Labels:
colorblock,
diy,
plastibands,
refresh,
summer
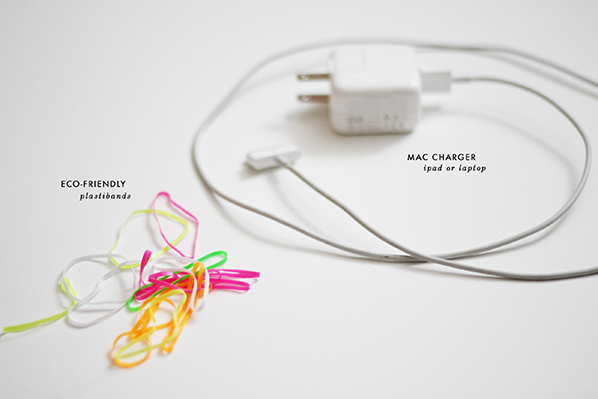
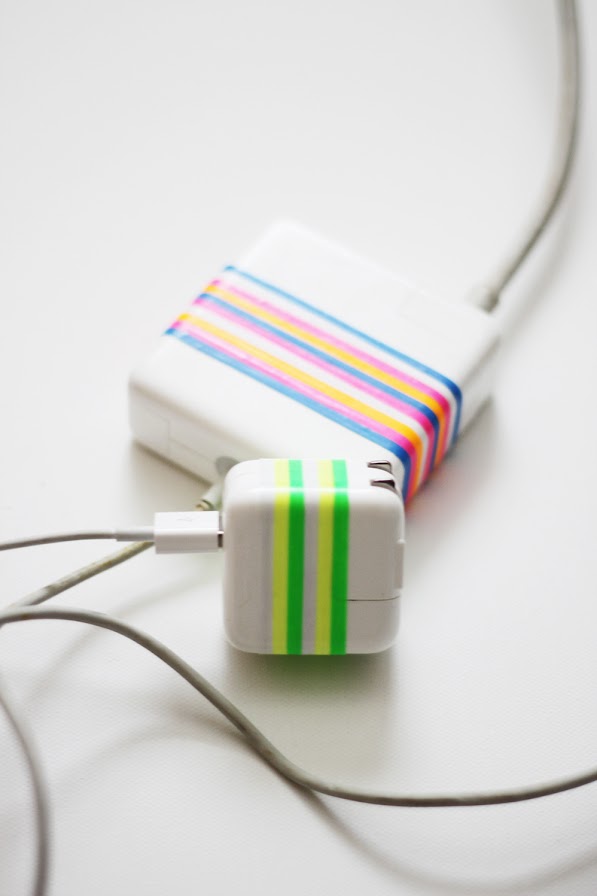
Pardon my slight delay with DIY projects this past week -- it's my senior week before graduation so I've barely had time to even upload pictures from my camera! Alas, here is this week's DIY which was totally inspired by all things summer, sorbet, and fresh. I'm not quite sure what to call it - is it an embellishment, a decoration, a...colorful thingy? Whatever it is, I decided to spruce up my mac chargers using these vibrant plastibands. I saw them by the check out counter at Blick's Art Supplies and Materials in Boston even though I didn't know what to do with them. I can't remember the last time I actually used rubberbands, but given how colorful these are I just had to find a way to put them to (consistent) use. Inspired by all the Washi Tape charger embellishments (though not pleased with the prices of washi tape!), I wanted to mimic that look using summer flavors. It's such a simple project (took me less than 5 minutes from start to finish) and it is completely customizable based on how you want it to look. Also, apparently, these plastibands are latex-free, 3X stronger than rubberbands, and recyclable - making them much healthier to use for both yourself and the environment (at least that's what it says on the package). Here is what I came out with, let me know if you try it too!

Simply unplug the usb cable from your iPad charger and begin sliding on the plastibands. I did each color twice to make the strips appear bigger. Decide on a color pattern and just keep adding bands as you please. The best part about this is that you can always start over, re-do it, change it, and add more colors as often as you like since they are not-permanent and won't leave any sticky residue like with Washi tape. The colors included in the box are red, pink, green, blue, yellow, white, and green. My first color combination was inspired by summer lemons and limes - just use green, yellow, and white. But don't stop there -- make friends and decorate your laptop charger too!

This next color combination was inspired by a flavor I saw in a local Cambridge ice cream parlor called orange berry sherbert. Sweet and fruity! Happy summer decorating!

5/20/13
5/10/13
DIY Project || #21 | Crochet Floral Bathing Suit & BuzzFeed

Labels:
bathing suit,
crochet,
diy,
floral
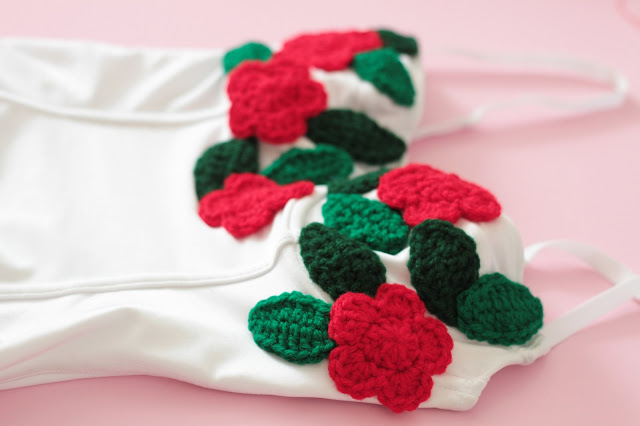
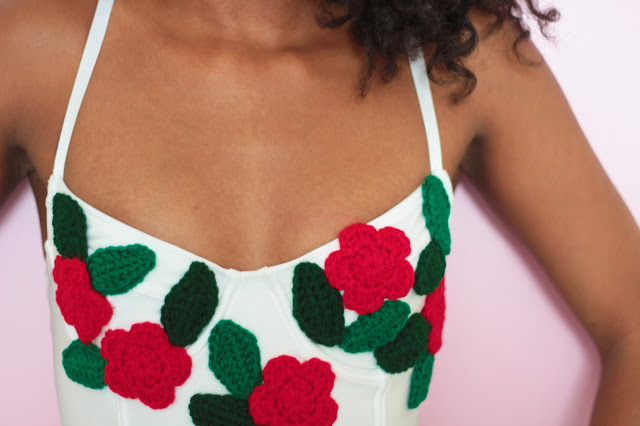
So excited to announce a project I recently did for BuzzFeed this month! The new DIY section of BuzzFeed has been gaining incredible amounts of attention since it started and the authors were looking for some fresh bathing suit DIY projects. I was pleasantly surprised to be selected as a contributing blogger and whipped up what is now one of my favorite DIY projects thus far! This fresh, unique, and colorful DIY was inspired by the Mexican embroidery I love (it's everywhere in Southern California where I'm from...and my parents spent 10 years living in Mexico, so it's all around our house too!). I have nowhere near the skills (or time) to actually properly embroider anything, so I took a bit of a shortcut and used these amazing crochet flowers and leaves to mimic the effect. You can find a wide variety of handmade crochet items on Etsy, and I fell in love with HCK Crafts' flowers. Not only are they superbly made, but the maker - Michele - put together a custom order for me in one day...so I'm definitely going back for more. Plus, the six big flowers cost only $3 and the 12 leaves for only $2.50!! It was a match made in heaven for me. Anyways, check out my bathing suit DIY on BuzzFeed for the full tutorial, as well as to check out some other awesome bathing suit DIYs featured by Anna Evers at Plan B and Aimee at Clones N Clowns.
5/8/13
DIY Project || #20 || From Maxi to High-Low Skirt

There's nothing better than a bright, bubbly, high-low skirt at the start of spring that cost you less than $10! Indeed, I purchased this skirt from a spunky vintage store in Boston a couple years ago and, until recently, actually put it to fashionable use. This post was one I originally did for I Like Fall at the end of last summer, but I love it so much I wanted to re-feature it here. It's super simply and easy to do if you have a long maxi skirt! Here is another great DIY high-low skirt tutorial I found super helpful from one of my favorite DIY bloggers, A Pair & A Spare. Her hem would work much better than the glue I used, but in case there are sewing-impaired ladies out there -- fabric glue is one heck of a best friend. Enjoy!
5/4/13
5/1/13
DIY Project || #19 || Mother's Day Gold & Floral Gifting

Labels:
diy,
floral,
gifting,
gold,
mother's day
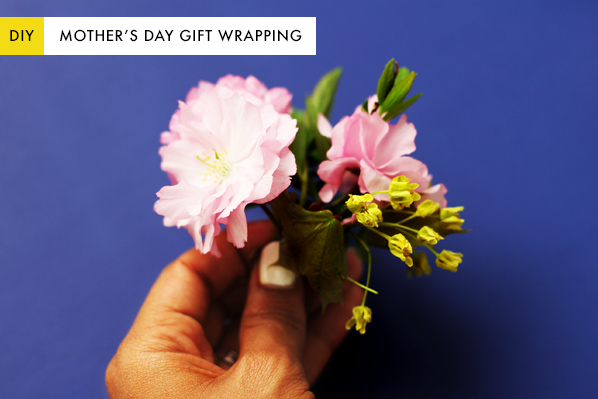
Mother's Day is just around the corner and I am loving all the beautiful gift ideas floating around the DIY blogosphere! In the spur of the moment, I decided to take a whack at my own mother's day gift wrapping and, as expected, veered towards floral and gold accents (there's something about me and gold if you couldn't tell already...my blog title is a lil' overboard...just maybe?). I saw these wonderful gold letter stickers at Blick's Art and Materials craft store in Boston and wanted to incorporate them somehow. With sticker letters, you can write messages on your wrapping paper specific to the mother, aunt, sister, friend, or grandmother that has had a special impact on your life. I chose the typical "love" message as my gift box was small, but a larger package would allow you to write several words. Well, that's enough chatter for now -- lemme show ya what I did!
Here are the materials you will need: small flowers (picked them from the street! yay for spring!), double-sided tape, gold sticker letters (find in craft or office supply stores), and plain wrapping paper.
The instructions are super easy and straightforward! After wrapping your present, decide on the word(s) you wish to use and start placing the golden letter stickers onto your packaging leaving a space to fit your floral accent bow.
Once satisfied with your gold letter placement, bunch together your flowers and leaves and tie together using a vibrant ribbon (I chose pink). Trim the ends so they are short. Attach a piece of double-sided tape to the top of the package and stick the floral bow onto it. Voila! All done! Now just wait and watch how troubling it will be for the recipient to take apart such lovely wrapping! Good luck, and Happy (early) Mother's day!

4/26/13
4/24/13
DIY Project || #18 || Kaleidoscope Earrings

Labels:
diy,
earrings,
jewelry,
kaleidoscope
After a brief hiatus from the blog in respect to the events that occurred last week, I want to thank everyone I know who's been really supportive and caring. I can't be any more grateful that my friends are safe, the perpetrators are no longer on the streets, and we can begin to move forward with heavier hearts.
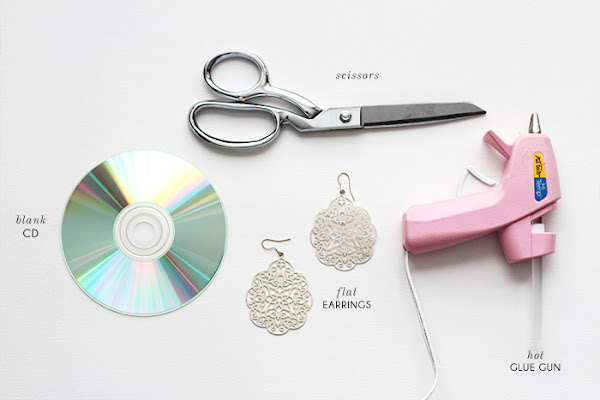
I wanted to get back onto my schedule with this DIY project I like to call Kaleidoscope earrings. I've seen similar projects that have used cut up CDs to put on wallets, necklaces, bracelets and such so I thoughtI I'd give it a whirl! If anyone has seen some cool CD projects, let me know and I'd be glad to link to them in this post!
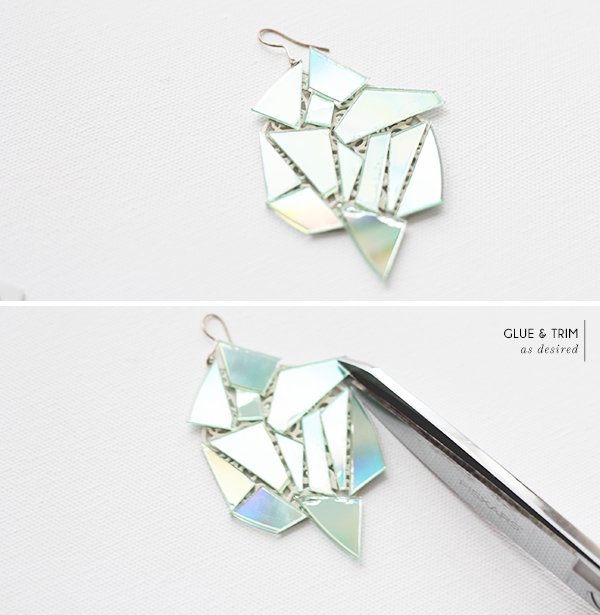
It's a fairly easy process overall -- probably took me about half an hour to do the whole project. Simply take a blank CD and cut it into small pieces (helps to start with big chunks then break it down smaller). Then, after situating the pieces onto your earring, simply heat up your glue gun and start attaching them on. Sometimes the glue will melt a bit of the silvery film that coats the CD, which I ended up liking a lot because to gives it a rougher edge and plays with the clear/reflective theme. After the glue cools, you can trim away any edges that might seem to sharp or poignant. Simply wipe the surface to rid of any sticky residue when you're done and voila! Hope you guys like it, let me know what you think!
4/18/13
Update || A Moment


My apologies for the recent silence on the Kipi blog. This week has been one of many trials and I would like to take the week as a moment of silence for those affected, traumatized, and hurt by Monday's bombings in the Boston Marathon. Though many of those I know who were in the marathon or near the blast are safe, my heart continually wrenches for those whose lives have been brutally interrupted by the evil acts of others. Let us continue to pray and reach out to those in need of help, and may justice be rightfully carried through.
4/10/13
DIY Project || #18 || Gifting with Gold and Tassels

This week I was inspired by subtle spring colors and couldn't help but bring out the peach colored yarn I've had stashed on top of my drawer for the past few months. One of my friends' birthday was coming up and she loves very minimal, yet elegant styles. I got her this standard moleskin notebook, perfect for her sketches, and wrapped it in an untraditional style. Using just a small necklace gold chain, yarn, and a bit of tape you can ditch those boring store-bought wrapping bows and make a unique, long-lasting wrapping. What's best about it is you can wrap anything in it and in a variety of ways, check it out below!

Making the tassel is so quick and yet such a more delightful look than a typical present bow. Simply wrap yarn around your palm (try using a variety of colors, too!), then slide the wrapped yarn off your hand. Squeezing at the top, wrap the last strand of yarn around multiple times until you are pleased.

Afterwards, cut the thread and tuck it into the wrapping (or glue it). Then, cut the bottom of the circular yarn until it starts looking like the all wonderful tassel. Feel free to trim the bottom edges if they are uneven. Next, carefully slide or thread the gold chain into the top of the tassel and wrap as desired across your gift. Simply tape the chain on the back (as this is what I did), so that the person can remove it and even wear it as a necklace or hang as decor! Sweeeet.


4/5/13
Friday Faves || #15 || Designing your Space

Labels:
decor,
friday faves,
furniture,
home,
room

I know, I know. I'm going a bit crazy with the home decor lately but that can all be explained! After landing my first ever full-time job (yay for post-grad life working out!) I've been scouring apartment sites for places to rent in Boston. Unfortunately, the stunning, all-natural, bright, spacious, and homey pictures I've been looking at on Pinterest have raised my expectations a bit too high now that I realized my budget probably won't get me anywhere close. Alas, the past friday faves have been my outlets to *imagine so wonderfully* what I would do if I had my perfect apartment space. For starters, there would be tons of natural light -- and I'm talking huge windows, please. Next, it would be a colonial, rustic place with hardwood floors and flat, white walls. The rest of the space I would pretty much decorate in all things Anthropologie, Urban Outfitters, vintage/thrift finds, and the occasional Ikea DIY piece here and there. Ah, if only this were real life!
4/2/13
DIY PROJECT || # 17 || COLORBLOCK BUTTON-UP

Labels:
aqua,
blouse,
colorblock,
diy,
fashion
I have been anticipating the week I get to post this DIY project for you all! I made this colorblock button up way back in January, but thought it fit better with spring time wear rather than winter. Anywho, I am a huge fan of all things colorblock so this project was right up my alley. After ransacking my older brother's closet on winter break, I found a couple white button ups from his younger days that fit perfectly on me. If you have a boyfriend, husband, brother, dad, or any other man who's closet you can raid -- get kickin! In just about an hour I transformed the shirt into a stylish, spring top that goes great when paired with skinny jeans and boots.
Here's what you'll need:
And here are the steps to make the shirt:

Step one: Lay out the blouse on a flat suface and, using a fabric cutter or scissors, begin cutting out the back piece of the shirt. I just cut along the insides of the original seams.
Step two: With the back cut out, lay it over the new, colorful fabric you wish to use. Cut the fabric along the outline of the original shirt piece, leaving about 1/2" to 3/4" extra along the borders. It helps to pin the two fabric pieces together while doing so.
Step three: Fold in the extra 1/2" that you had cut all along the sides and then loosely hand-stitch the sides inside. I did this because the fabric I used frays a lot, and it made it a lot easier for adding it to the shirt.
Step four: Then, pin the new backing to the shirt, exactly how it was originally.

Step five: Slowly with the sewing machine, stitch the new colored piece to the shirt along the seams.
Step six: If you haven't done so already, cut and pull out the hand-stitching you had made in step three so you get a flawless look! Voila!
4/1/13
Graduation Countdown || #2 || My Spring Bucket List Update

Labels:
bucket list,
graduation,
photography,
seniors,
thoughts
As I mentioned earlier here, I kicked off my senior spring wanting to try a variety of activities that I have yet to explore on campus before graduating. Ideally, I wanted to do 99 things in the 99 days remaining until graduation. Now, that number has dropped to just 60 days! Gasp! Well, I still have a lot of work to do but I was pleasantly surprised with everything I was able to do over just the past couple months especially. Here is the visual proof below, and my brief notes about each one afterwards!
1. Go on a spring break trip - went to Florida with my girls!
2. Dance in Ghungroo Performance (South East Asian dance show on campus) - danced in the senior segment!
3. Sled down Harvard yard steps - thanks to Hurricane Nemo, I went down Memorial Hall steps on a dining hall tray!
4. Attend Celebration of Black Women (campus event organized by the Black Men's Forum at Harvard) - went for the first time, got a rose and a special note!
5. Go to the Holi Festival (cultural Indian/Hindi festival including dancing and the throwing of colored powder) - got purple, pink, and yellow in my eyes, mouth, and hair...and I loved it!
6. Deliver letters on Housing Day (a Harvard tradition where freshman are randomly selected into one of 12 upperclass houses) - chanted until my throat was sore and ran like never before in the yard!
7. Go out dancing in Boston! - went two times already with my girls to a dance club in Boston!
8. Attend an IOP Forum (generally high-profile individuals who come to speak at the Harvard Kennedy School of Govt.) - went to go hear actor Sean Penn and former prime-minister of Haiti, Michelle Pierre-Louis, discuss Haiti 3 years after the earthquake
9. Try a new food place in the Square - a few days ago I finally tried Clover, an entirely vegan restaurant just across the street from my old freshman dorm. The rosemary fries are perhaps the best fries I've ever tasted!
3/29/13
Friday Faves || #14 || Triangle Home

Labels:
color,
decor,
friday faves,
home,
triangle
I have been loving the triangle look on all things decor. I think triangles are such interesting shapes because they can be warm and edgy simultaneously. I dream of the time when I can finally do whatever I wish to my living space, but in the meantime these are my fave triangle decor favorites! And if you're looking for equally killer triangle clothes, these cut out jeans are pretty bomb (see here).
3/28/13
Thoughtful Delight || Living [is] easy

Labels:
living,
photography,
thoughts,
work
 |
| source |
Living is easy. So easy. It's so easy to mess up, to get lazy, to be tired and bored. It's so easy to be disinterested, unmotivated, unforgiving. It's so easy to forget, to never respond, to never choose, to linger endlessly and endlessly and endlessly. Living is easy and not how we like to think. We like to define living as one entrenched with passion, with moments strung together like constellations, with everything meaning something, with midnights filled with moonlit conversations contemplating what could be next. We like to think living is exciting. To think it is defined by risks that changed who we are, who we know, and what we do for the better; to think it is defined by the amount of smiles we give and receive, the hours spent wiping tears from laughter, the numbers of friends willingly standing by our sides. This may very well be part of living. But it's not all of it. It's not hard yet. It's hard to embrace the fact that living is not defined by sparks but by dullness. It is not defined by the single momentous day but by the meshing of hundreds and hundreds of uneventful days. It is not the sole red balloon drifting upwards in the sky but rather the vast, blue air that encompasses it -- the air that has been there all along.
3/26/13
DIY Project || #16 || Multi-Purpose Butter Balm

Labels:
butter balm,
diy,
lips,
makeup
I have seen the Altoids can being used for similar storage purposes within the DIY world so I didn't hesitate to try it out as a container for my quick butter balm. I recently travelled on my spring break vacation and only used a small carry-on for my luggage. Thus, everything had to be 'bite-sized', if you will, and I needed to bring along some type of all-purpose butter especially for my face after swimming in chlorine, salt water, and who knows what else. As a very curly-haired gal, I also love to use just a tad of the balm for my curls. It makes them so soft, bouncy, and much less frizzy. Overall, this little hand-dandy butter balm is super quick to make (took me less than five!) and super convenient to carry around. I also love that it is really creamy and smells great, making it so much more fun to spread!
A lot of the ingredients can be found in healthy food stores, especially Whole Foods and Trader Joe's. You can also find them at The Vitamin Shop and GNC, other vitamin/fitness food retailers. The Shea Butter can easily be found on Amazon, and a little goes a really long way. I purchased a big jar (a bit bigger than your standard peanut butter jar size) from a fellow peer who is from Ghana and the butter is fair trade and made in the country. So far, I have used less than 1/10th of the entire thing and it cost me $7! I know Coconut Oil and other essential oils (such as peppermint) can run on the more expensive side of things, so if anything I'd highly recommend just buying a jar of 100% Shea Butter. It will be your answer for all things in life...pretty much. Let me know what you think!
3/22/13
FRIDAY FAVES || #13 || SPRING CLEANING IN COLOR

Labels:
cleaning,
color,
friday faves,
organize,
spring
I was so happy last week when I could roll up my sleeves and get to cleaning. When you're living in a cramped dorm room with midterm books all over your desk, pencils hidden in unsuspecting corners, and Starbucks cups overflowing the recycling bin, there's nothing more refreshing (I think) than wiping away the previous months of stress and hard work. Unfortunately, there is no Staples 'easy button', but I love spring cleaning because of all the color you get to infuse into your space throughout the process. Here are some of the first ways you can tackle your spring cleaning that are sure to brighten and color away winter blues. Good luck!
1 // Image Source
2 // Image Source
5 // Hot Stuff Skirt
6 // DIY Marker Caddy
Subscribe to:
Posts (Atom)


